UiPath Studio Integration with Git
Agenda
- Introduction
- Part 1: Github setup and first commit
- Part 2: Clone repo to start a new local project
- References
Introduction
Some time ago, my UiPath Studio updated to include Git integration. I did not have an immediate use case for Git and UiPath, but I was very interested in possible applications. I could envision several good use cases for Git, including:
- personal version control for complex projects
- an easier way to access your projects across multiple computers
- a better way to distribute projects among multiple developers
Eventually, I had a remote customer with an automation project that needed some improvements. I made a private repo, invited him in as a collaborator, and we peer-developed using Git (a substantial improvement over emailing project folders). In this blog post, I will detail the basic steps to setup UiPath-Git integration: Initializing a local project into a Git repo and cloning a repo to a local project. This integration features UiPath Studio Pro Community Edition, Git version 2.26.0 for windows, and GitHub.
Part 1: GitHub setup and first commit
Step 1: Initial requirements are a GitHub account and a version of UiPath Studio with Git integration. To verify, examine the “Team” tab of the Studio launch screen and ensure that Git is present as an option. To begin, log onto GitHub and make a new repo (public or private), resulting in image 1. Note the GitHub repo URL on this page and the copy to clipboard button for a later step.
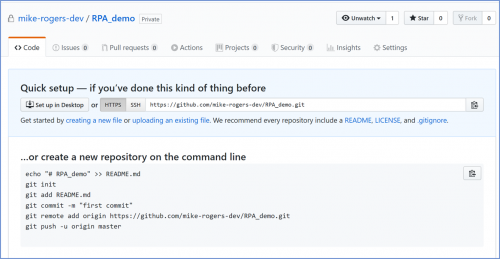
Image 1.
Step 2: Next, start up a new blank UiPath project, which will be used to initialize this repo. Image 2 is a picture of Studio (the project is named “UiPath_Git_Integration”) with our demo automation of a single message box.
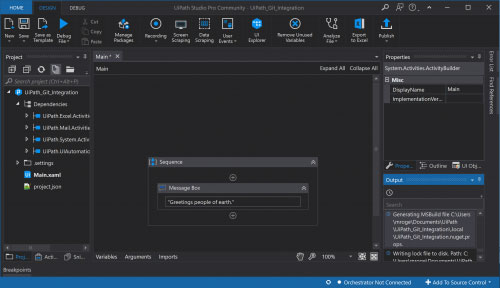
Image 2.
There are two ways we can quickly identify if this project is currently integrated with source control. First, on the toolbar at the lower right, we see “Add to Source Control” indicating current status as an offline project. Second, make note of the object icons in the Project viewer sub-window (left pane of Image 2). This is the default we are all used to seeing, but there are subtle differences under source control. Before we can compare the two, we must first initialize the project.
Step 3: To add this project to source control, first save the project and click the “Add To Source Control” button. Before adding you project to source control, this popup menu lists only two commands “GIT Init” and “Copy to GIT” (See Image 3)
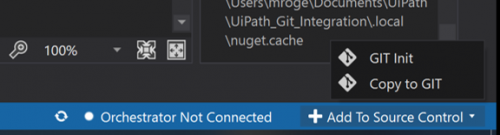
Image 3.
Once we click GIT Init, Studio prompts you to choose the working folder for the local repository. You may use the current UiPath project folder or another location. Once you select the folder space studio, offers to add files to the commit action (essentially a Git add, seen in image 4). Type a commit message then click on Commit and Push.
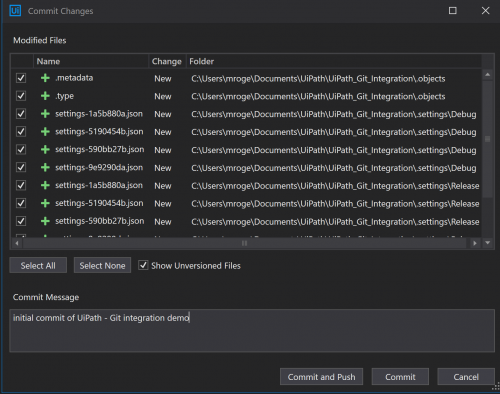
Image 4.
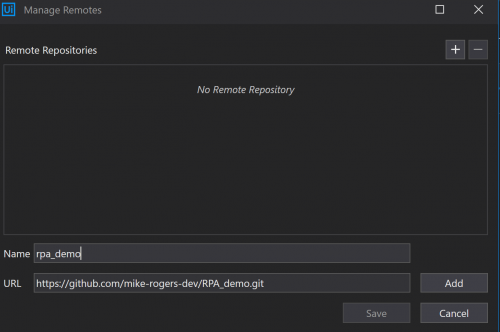
Studio now prompts the popup window shown in image 5. To finalize the Git Init we must enter the Git URL for the repo we created in step 1. Use the copy to clipboard icon on the GitHub repo page, enter the Git URL and name, click Add, and Save. Studio now asks for GitHub credentials. Enter the username/password and click OK to complete the process.
Finally, in image 6, we see the fully initialized GitHub repo. The next step will demonstrate how to commit and push changes to this project.
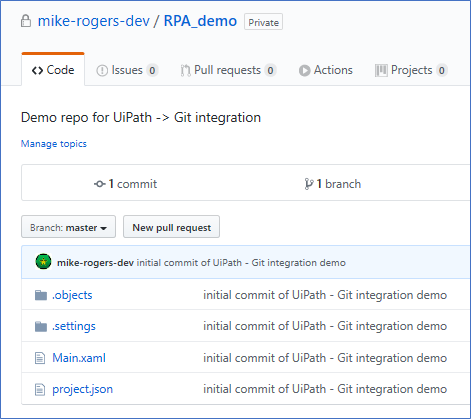
Image 6.
Step 4: After the commit, UiPath Studio is open, and the project is added to a GitHub repo. Image 7 shows the new studio presentation to compare with Studio before the Git integration.
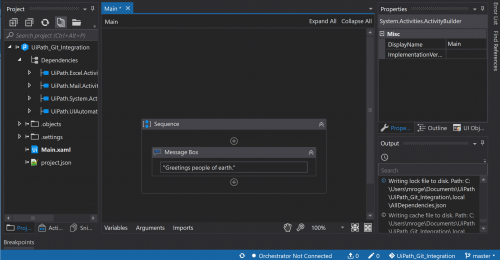
Image 7.
Comparing this image to image 2 above in step 2, there are key differences we must understand. First, the objects in the Project viewer sub-window are visibly different (left pane of Image 7). The small icon to the left of each object indicates the source control status. The Main.xaml object shows a pencil icon when the program is in a saved state with unpushed changes. Right-clicking on a single object or the entire project in this viewing pane brings up the context menu with Git command options. To avoid redundancy, I will show these in better detail using the blue footer toolbar. Image 8 shows this toolbar in detail with the helper text for each important menu button.

Image 8.
Above each button is a brief description of its purpose. At a glance, you can quickly determine four things (from left to right):
- Have I committed changes not yet pushed?
- Do I have changes not yet committed (and how many objects have changed)? This is the commit log.
- Which project do I currently have checked out?
- What branch am I currently working on?
Now that we understand the toolbar, we will make a change to the project and push it to GitHub. Now that this project is synced to GitHub, the toolbar flags a change on any saved update to the automation (See image 9).
![]()
Image 9.
Within a second or two of the update, the changes icon reflects a “1” and clicking this button pops up the commit log window as seen in image 10.
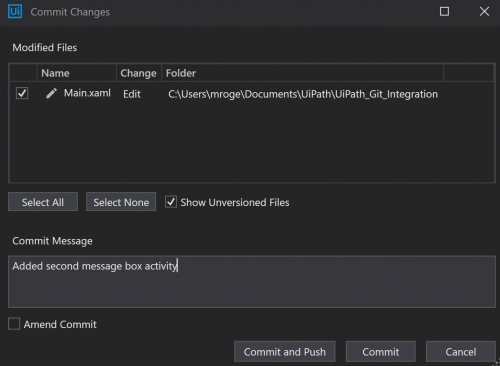
Image 10.
After verifying the log, we can commit and push or commit now (and push later). Next, commit and push to verify everything is working correctly. On the Studio side, we can confirm the push by verifying our toolbar no longer shows an unpushed change. We can ensure the update is present after a refresh to our GitHub repo page (image 11).
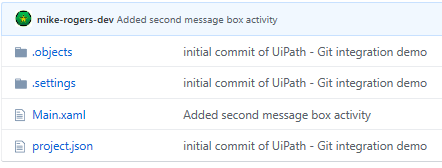
Image 11.
Part 2: Clone repo to start a new local project
Step 1: This second part of this tutorial details how to clone the UiPath project from an existing GitHub repo into UiPath studio. This is essentially the opposite of Part 1, or the follow-on process when another developer seeks to collaborate on the same project. We start with a local destination for the project – an empty directory as a target for the clone. I created an empty folder named RPA_demo in my usual UiPath workspace.
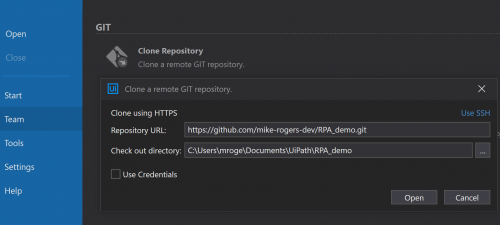
Image 12.
Step 2: Open an empty studio instance, click on the Team tab and click on the “Clone Repository” text to reveal the popup shown in image 12. Enter the repo URL from GitHub, browse to the desired local folder (RPA-demo in this case), and click open. Image 13 shows the Studio view for our new cloned repo project. Notice the toolbar looks very similar to that of Part 1, except the new Project Name of RPA_demo, because we have loaded the file into a new project folder.
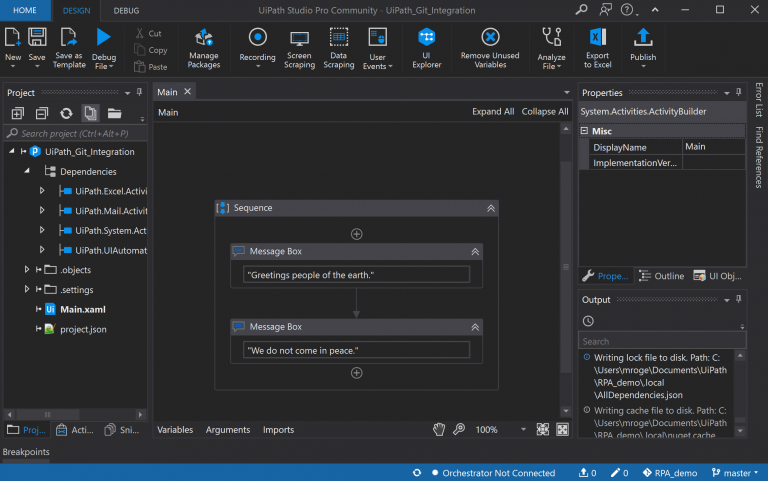
Image 13.
In conclusion, this introduction to UiPath – GitHub integration focused on basic functionality:
- creating a new GitHub repo
- initializing a local project into the repo
- changing the project followed by a commit and push
- cloning a project from an existing repo
Useful References:
https://docs.uipath.com/studio/docs/managing-projects-git
https://help.github.com/en/github/using-git/which-remote-url-should-i-use

